I found this easy peasy method of perfectly joining your binding over at Purple Daisies LLC.
I have had the pleasure of watching them both in action and the methods they use teach make it easy for everyone, even the beginner, to make amazing quilts.
Those Schaumber girls are something else!! Pop over to their facebook page and tell them HI!!
https://www.facebook.com/pages/Purple-Daisies-LLC/348330287010.
A flow chart to troubleshoot some of the basic sewing machine issues. From Sew News.

Easy Quilt Measurement
ChartsEach chart has some unique information - Credit is given when the source of the chart is known.
 I found this on Pinterest but thought it was an awesome idea.
....because as I get "older", it gets harder and harder to read the size of the sewing machine needle that I am using.
This system, which I believe is simply magic marker drawn on a mini turned "quilt", parks your needles in a readable "stall" for easy identification when needed.
Sometimes, organization is so simple... if we would just think of it :)
 How to Make Your Own (really cheap!) Cone Thread Stand
I have not been able to find a sturdy stand locally to use with cone threads. The only ones I’ve seen are attached to the table of industrial sewing machines. Purchasing one in the U.S. and having it shipped down has not seem cost-effective. Enter my homemade solution:
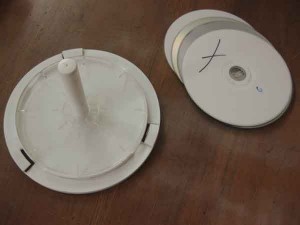
 1. Take the plastic spindle of a CD case (we buy a lot of blank CDs around here!). For this purpose, you need one with a tall spindle.
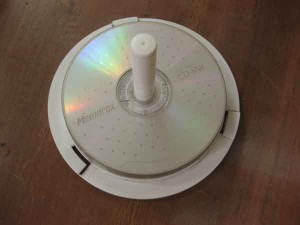
2. Just in itself it is rather flimsy, but if you stack some old, discarded CDs on it, you will be weighing it down. (You can also lift the plastic disk and place small BB pellets under the disk to weigh it down. But old CDs work fine for me.)

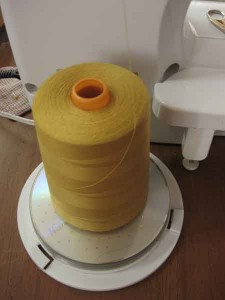
3. Place your cone on top, and forget about it tipping over!

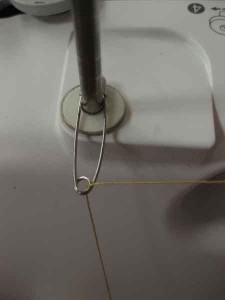
4. To complete the holder, place a small safety pin on your spool holder, and run the thread through the eye. Then thread your machine as usual.

A nifty, cheap, practical solution.
 1. Take the plastic spindle of a CD case (we buy a lot of blank CDs around here!). For this purpose, you need one with a tall spindle.
2. Just in itself it is rather flimsy, but if you stack some old, discarded CDs on it, you will be weighing it down. (You can also lift the plastic disk and place small BB pellets under the disk to weigh it down. But old CDs work fine for me.)

3. Place your cone on top, and forget about it tipping over!

4. To complete the holder, place a small safety pin on your spool holder, and run the thread through the eye. Then thread your machine as usual.


Curing Seam Allowance Woes
Are your seam allowances getting folded over as they pass over the gap between sewing machine bed and throat plate?

Do the back seam allowances sometimes get all smushed up and sewn lumpy no matter how careful you are?
Mine too!! I may have a solution for you!
 A simple piece of tape laid across the gap where the seam allowance would ride has solved the problem for me. The seam glides over the gap like its not there.
 Make sure that you do not place the tape over the feed dogs and please NOTE that when you change bobbins, you may have to adjust the tape or reapply..... but I think its worth it.
 DIY THIMBLE
 I love doing hexies (English paper piecing) but I do not do well with thimbles. Thus, I am limited in how long I can hexie. I have found something that works well for me and gives my fingertip a bit of protection... duct tape. That's right, duct tape, good old fashioned silver duct tape. It can't be the cheap kind... get the good stuff.
 Rip off about 1/2" of the tape from side to side, then rip that down the middle, side to side again, so you have 2 pieces about 1/4" wide. Then rip one of those pieces in half so you have 1 long piece and 2 shorter pieces. Lay a shorter piece across the tip of your finger, taping it down the sides of your finger. Lay the other short piece across the tip of your finger the opposite direction, taping in down your fingernail and down the pad of your fingertip. The long piece with be taped along the same line as the first piece, taping down the sides of your finger.
The first time you feel a poke from the needle, fix yourself up another "thimble" and keep on hexing!
BOBBIN STORAGE
After I bought my first Pfaff, I bought 100 bobbins for it on eBay. I was able to buy 100 for the same price as buying 25 from the quilt store. Anyway, I figured I could drop/accidently throw into trash can/lose/step on a few and still have plenty.
 I will wind all the bobbins (did I mention how much I love my pink bobbin winder?) I think I will use for a project and I am ready to go. The only thing worse than running out of bobbin is needing to stop everything to WIND them. ack.
I have been storing them 3 high on my thread rack but I found this idea I love better! I can then pack them into the tote with the project and if I have to put it aside for a while, everything is still together and, if I used specialty thread, I can start right back up on the project without searching high and low for something.
AND to make sure I use, reuse, and use up, I can always find ice cube trays at thrift shops. Throw them in the dishwasher and you are good to go!!
.jpg)


No comments:
Post a Comment